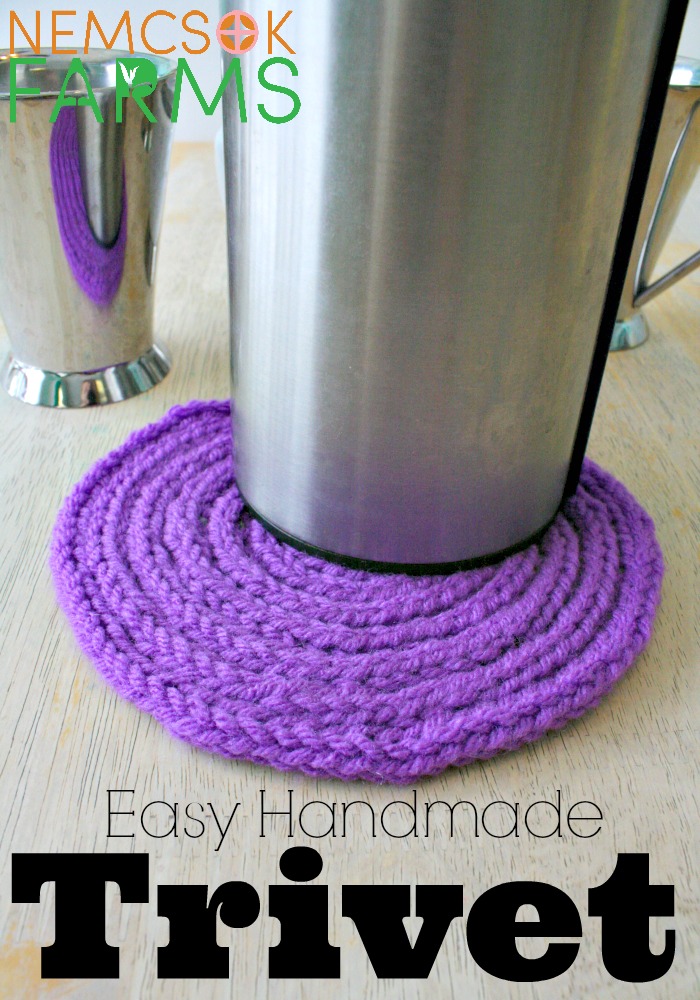
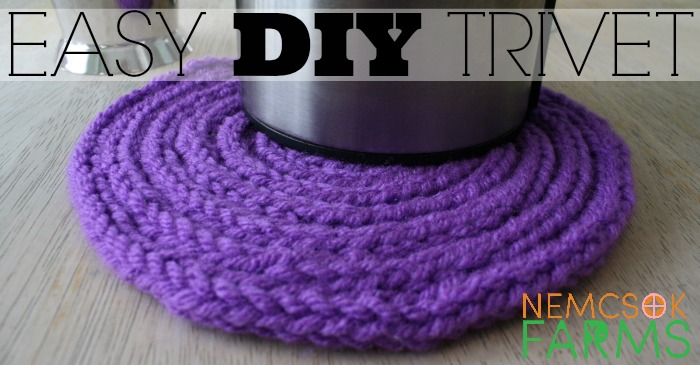
You Guys! I have something quite awesome for you. You can call them hot pads ( my husband thinks I made that up) potholders, or trivets. Regardless of what you call them – stick around, I’m gonna show you a super easy way to make them!
Before we go any further, we need to talk about I-cords. If you don’t know how to make them, head to the fun and easy to follow tutorial I wrote here, ( just open it up in another tab so you can come right back ) and then once you have that started – come back. Go ahead, I’ll wait.
Ready? Ok great. Let’s move on
And by Easy, I mean Easy.
This handmade trivet is made completely by hand. You don’t need any special skills to make the trivet itself. The I-cord, as you recall from just reading my tutorial, is simply the knit stitch over and over again. That too is really easy, and if you think you can’t do it – I suggest you try. You’ll never know what you can do unless you try. Trust me, I have some experience in that subject.
And you’re saying ‘ oh sure’, right?
But really, it’s true. Take for example, cartwheels. When I was much younger, I loved gymnastics. I could cartwheel and flip and dive and roll, and fly over bars like nobody’s business. Over time, I guess I stopped doing that stuff, and one day, in my mid twenties… I thought – hey, I haven’t done a cartwheel in like forever! I should totally do cartwheels. Well, I couldn’t do it. I tried over and over again over the course of a week, and eventually gave up. I decided, I can’t do cartwheels anymore. AND THEN, last summer, in my 38th year of life, my children were wanting to do cartwheels… so I wanted to do them too. And you know what – I did it. I CAN DO CARTWHEELS.
Want another example? Of course you do. What else are you going to do while you’re making that I-cord? It’s almost like I’ve got a captive audience… this must be how my children feel when we’re travelling. Anyway, from one digression to the next… So where was I? Oh yes, splitting wood.
I have tried throughout my life at various points to split wood with an axe. It is something I always wanted to be able to do, but could never quite master. I wasn’t strong enough, didn’t have the right technique. Was too shy to try when anybody else was nearby. I told my Dad one summer that I was disappointed in myself because I could not split wood. He said, and quite eloquently , “bull____”. I told my Husband that I was frustrated that I couldn’t split wood, he said a little more politically correct than my Dad, but to the same effect “of course you can. it’s just technique”. So I watched, and tried. And watched, and tried. And then, decided that it is easy to say it about technique when you are 6 feet tall and all muscle-ly. UNTIL LAST SUMMER, when I thought, hey, I want to split wood with an axe. So I picked up an axe, set my piece of wood on a chopping block and it took a couple tries… but I did it. AND I LOVED IT.
How’s that I-cord coming along?
Easy Handmade Trivets
Materials
- an I-cord made with 6 mm double pointed needles and worsted weight yarn, about 10 feet long.
- yarn of any colour and any weight. I used a worsted weight yarn ( #4) in purple, from my stash. to make the I-cord, and then I used a contrasting colour to make the ‘keeper’ and also to sew it up.
- Darning needle
- Scissors
Directions
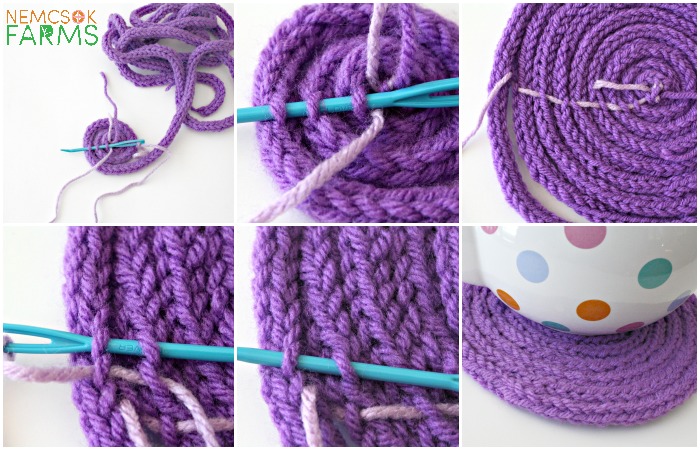
- Take the I-cord and begin to work it into a spiral. Use the darning needle and the yarn you have chosen to form a ‘keeper’ as shown in the picture. Basically work the thread through one stitch on every ring of the spiral to keep the cord in place.
- Once you have the spiral formed, thread your darning needle with the yarn again, and start at the outermost edge, at the end of the cord. Begin to sew the spiral closed by sewing through one stitch on the outside ring, and one stitch on the ring next to it.
- Do this all around the spiral, until it is completely secure. Secure the thread, knot, cut, and weave in the thread ends from sewing.
- Invite your friends for tea. And try doing cartwheels.
So, what do you call them? If you loved this Handmade Trivets tutorial, you need to check out all of our other great DIY projects, like the Big Hat, this Yarn Tassel, and of course you can’t leave without trying the Wavy Washcloth pattern.
Do you follow us on Facebook? Instagram? Pinterest? Well, you should.